When I was building Vault, the data warehouse for the Hakkasan Group, I had to accommodate data sources that post data files to an FTP server. I didn’t want to compromise the security of the data warehouse by running an FTP daemon on an existing server in Vault’s secure production environment, so I spun up a dedicated FTP server outside of that environment in the same Amazon EC2 data center.
No self-respecting DevOps practitioner would set up a server like that manually. I used Chef to configure the cloud instance. But I also wanted to automate creating the instance, not just configuring it. One way to do that is with the Knife tool in the Chef suite of tools. Knife is powerful, but using it is not simple, especially without a Chef server. I wanted to automate as much of the process as possible, so that ideally creating the server in the cloud is as simple as pressing a button and then sitting back and watching it happen.
To accomplish that, I turned to Vagrant, a tool originally intended for creating development environments. Now it’s capable of a lot more. Vagrant’s multi- provider technology makes it easy to use the vagrant-aws plugin to create cloud instances on Amazon EC2, or vagrant-rackspace to use Rackspace, or vagrant-google for the Google cloud, or others, in addition to local development environments.
My original plan was to use the FTP support from Box.com, but the first data source was OpenTable. Let’s just say that the technical people at OpenTable are apparently focused on things other than assisting enterprise-level restaurant accounts with accessing their own data. After over two months of watching them fumble helplessly at getting their system to post files to Box.com, I gave up and told them that I would set up the most vanilla FTP server imaginable. (They still could barely figure it out.) If all that you need is a cloud FTP service, you might want to just go and get a Box.com account. They’re awesome. I had to find a different way.
My goal was to get vsftp running in the cloud with the most boring
and conventional configuration possible. I used the vagrant-aws plugin
to create an Ubuntu 12.04 cloud instance at
Amazon EC2. I used the vagrant-omnibus plugin to install Chef,
and then I used Chef to provision the instance with vsftp, to configure it, and to
create the FTP user(s). The whole thing is fully automated from the vagrant up
command.
I used the new bursting T2.micro instance type that only costs $9.50 per month. Plenty of power for an FTP site that only handles a few transfers per day.
vagrant plugin install vagrant-omnibus
One of the goals of DevOps is to create servers with code like this, instead of with manual labor like this. So you’ll need to get some code. The code for creating this FTP server is stored in the endymion/ec2-ftp project on GitHub.
Clone the project to your development system by opening a terminal and switching to the
folder on your machine where you want the code (suggestion: cd ~/projects
) and enter
this command: git clone git@github.com:endymion/ec2-ftp.git
. If you can
cd ec2-ftp
then it worked.
The meat of the project is in the Vagrantfile and in the Chef recipe. When you give Vagrant
the vagrant up --provider=aws
command, it looks in the Vagrantfile for the
aws configuration section.
That section includes the AMI
to use, the region where you
want your cloud instance to run, and the instance type. The key and secret for accessing AWS comes from
environment variables
that you need to set before you run vagrant up
, as well as the name of the
EC2 key pair that
the vagrant-aws plugin will install on your new cloud instance, so that you can connect to it
with vagrant ssh
.
To spin up an EC2 machine you’ll need a key and secret for accessing your AWS account. Create an IAM user in a group with full access to EC2, and provide the key and secret by setting two environment variables:
export AWS_KEY=“[YOUR KEY]"
export AWS_SECRET="[YOUR SECRET]”
To access the EC2 machine you’ll need an EC2 key pair. If you have a key pair in a file
called ec2-ftp.pem
in the root of this project, then you can configure that
by setting two environment variables, like this:
export AWS_KEYPAIR_NAME="ec2-ftp”
export AWS_KEYPAIR_PATH="ec2-ftp.pem"
I needed to create a few FTP users, so that each different data source has its own login to the server. It’s not good practice to store sensitive information like usernames and passwords in any code repository, so I used a separate YAML configuration file that is not stored in the Git repository.
You’ll need to provide a users.yml
file in the root of this project that contains a list of
users to set up on the server. You can change this file after the server is running and then re-
provision later with Chef, using vagrant provision
to make changes to the user list.
The format of the file is:
username:
password: 'password'
shadow_hash: 'shadow_hash'
For example, if there are two users, foo
and bar
, with the passwords password1
and password2
respectively, then the file should look like this:
foo:
password: 'password1'
shadow_hash: '$1$yoursalt$u/huh9HuopXpub4Ha3SWO/'
bar:
password: 'password2'
shadow_hash: '$1$yoursalt$AWgHV/EkLFgEsWORPVSjh.'
The password:
entries are really just there for your benefit. If you’re storing them
somewhere more secure then they’re not necessary.
Generate the shadow hashes with:
openssl passwd -1 -salt "yoursaltphrase"
Use any salt phrase you like.
Once you have the prerequisite software, the code for setting up the server, your AWS authentication, and your user list set up, you can create and configure the server with one simple command:
vagrant up --provider=aws
Now just sit back and watch it go. Map a CNAME DNS entry to the instance once it’s running, and you’re done. If you need to add more users, then add new entries to your users.yml file and then run Chef on the cloud instance again with:
vagrant provision
Make sure that you have ports 21 and 22 open in the security group for your instance. Port 21 is for FTP, and port 22 is for SSH and SFTP.
Once the server is up, you can connect to it via SSH with Vagrant with the command:
vagrant ssh
That’s one of the reasons that Vagrant is awesome. You don’t need to keep track of the IP or hostname of your instance, and you don’t need to manually tell it what key pair file to use when you connect. Just tell Vagrant to give you an SSH connection and it will take you there.
You should also now be able to connect to your new FTP server from any FTP client, either with straight FTP or with SFTP. The Chef recipes create and install a self-signed certificate for sshd so that you don’t have to.
For security reasons, vsftp does not allow a user’s home folder to be writable. You could override that to make things simple, but it’s set up like that for a reason. The best practice is for a superuser to create a subfolder in each user’s home folder and then use that for FTP files. I needed a custom setup in each user’s home folder, but you could easily create a “files” folder automatically in the Chef recipes if you want to automate that process for every user.
]]>I still maintain a web forum that I set up over five years ago for the Miami nightlife community, but I can’t afford to spend a lot of time dealing with it. Recently, the PHP-based ad management package that I used (and never had time to update) was used as an attack vector, and so it had to be removed. I needed a replacement but I just didn’t have the time to deal with setting up a new ad package, and I don’t really want to deal with any PHP software packages other than the forum software itself, phpBB 3. I don’t want the liability of needing to stay current with security updates for yet another piece of mission-critical software.
Then I realized: I don’t care about tracking the impressions or clicks. The site is fairly popular in its niche, and sometimes the ad space is worth money. But in nightlife, generally advertisers only care about the length of the ad campaign (a week or two) and nothing else. Nightlife advertisers are generally not sophisticated enough to even care about clicks or impression counts or ROI.
So why not just do it all in Javascript? All of the work could be done by the client’s browser, and there would be no possibility of a security breach through an outdated ad management system. And it would work with PHP or Rails or even a static HTML site. And so the Super Minimal Ads project was born. About an hour later, I was done.
The forum has two different types of banners, one for the main leaderboard and one for the flanks on the sides, so the type
parameter makes it easy to use the same banner.html
file for both ad zones.
Each banner includes a weight, and a URL. It’s generally not a good idea for humans to be editing raw JSON data, so I made that file a .js file, which makes it a little simpler to display a parse error message when there are problems. Here’s an example:
1 2 3 4 5 6 7 8 9 10 11 12 13 14 15 16 17 18 19 20 21 22 23 24 25 26 27 |
|
The last ad in the list has a weight of four, so it will appear four times as often as any of the others. So half of the time, the last banner will be displayed.
The file banner.html
does all of the work. It’s a bare-bones HTML5 page, with no content. It writes its own content with Javascript. It looks in the query string for a type
parameter, and uses that parameter to fetch a banner setup file. The banners
array from the setup file gets added to the namespace, and then the randomBanner()
function picks a random banner based on the weights specified in the setup file.
1 2 3 4 5 6 7 8 9 10 11 12 13 14 15 16 17 18 19 20 21 22 23 24 25 26 27 28 29 30 31 32 33 34 35 36 37 38 39 40 41 42 43 |
|
The last step is simply to include the banner.html
file with a type
parameter, in an iframe. This is the code used to insert the banner at the top of this page:
1
|
|
Don’t like iframes? Yeah, I don’t either. No problem, just add the script code directly to your site’s page, and change the target in the $('body').append...
to put the banner where you want it in your page.
The whole point of this system is to eliminate 100% of the server-side code for serving ads. That eliminates any possible security risks associated with an ad management system. And it also means that you can use it with PHP or Rails or .Net or Dart or any web framework of any kind. Including no web framework, like this Octopress web site, which is hosted on Amazon S3, and doesn’t use any server-side web framework at all.
]]>When I started using Octopress to build web sites, I was a little surprised to find that there aren’t a lot of pure Ruby tools for checking links. I want to check the links in new pages before I publish them, and I want to be able to check the links on the entire site so that I can fix dead links as time goes on. And I want to do it with Ruby on my machine, not against a live server with a Mac app or a Windows app or something. That’s just the Octopress way.
It didn’t take long to make a Ruby script to find the HTML files in the ‘public’ folder of my Octopress site, find the external links in each file using Nokogiri, and check each link. I set it up to display passing results in green, errors from bad links in red, and warnings about redirects in yellow. I set it up to spawn a thread for each file and check them simultaneously, instead of (slowly) checking each HTML file in sequence. That’s pretty much all that I needed for my Octopress sites.
But this seems like something that other people might want to do, so I took the extra time to make the tool more generalized so that it can be used with any web site generated by Jekyll or any other kind of static HTML generator, not just Octopress.
And maybe you might want to check the links on a live web server, not static HTML files on your development machine. So I added a web crawling feature using Anemone so that you can target the URL of a live site instead of a file path. I want these features to be solid and reliable over time, so I built all of it with RSpec testing and confirmed 100% test coverage using SimpleCov. And you might not agree with my idea of sensible defaults, so I added a couple of command-line parameters for controlling warnings and errors. The link-checker gem is pure Ruby and you can get it from RubyGems. The code is available on GitHub.
To use the link-checker gem in a Ruby project, just add the gem to your Gemfile:
1
|
|
Then run bundle install
, and you’ll have a new command, check-links
.
Just give it the target that you want it to scan. For example, if you have an Octopress site then your output HTML is in the public
directory, so call it with:
check-links 'public'
Or if you want to check the links on a live site, then give it a URL instead:
check-links 'http://www.ryanalynporter.com'
If you don’t pass any target, then the default is to scan the “./” directory. If you have a Jekyll site that you deploy to GitHub Pages, then you can check the links with just:
check-links
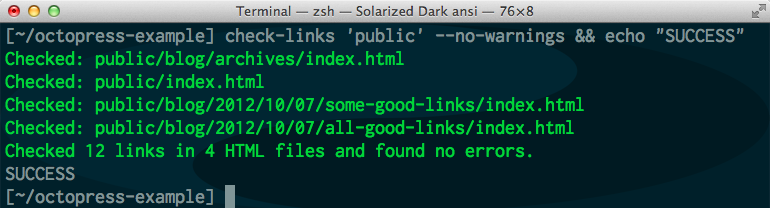
The check-links
command will return success if there are no errors, and it will return an error if it detects broken links. So you can use the return value to make decisions on the command line. For example:
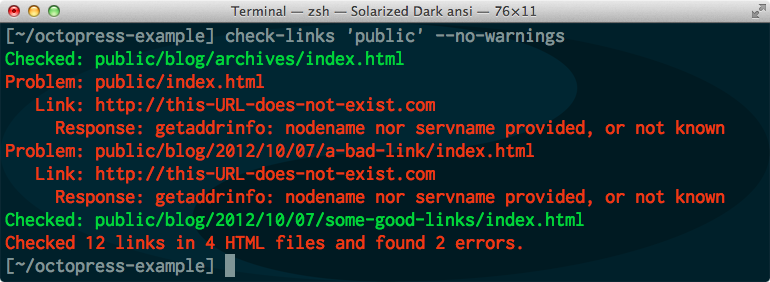
I like to see yellow warnings for links that redirect to other valid URLs. You might find that irritating, and you might just want to see green or red. So just add the --no-warnings
parameter, and you won’t get any yellow warnings.
check-links 'public' --no-warnings
Instead of the yellow warnings from the first screen shot above, you’ll only see green. (Or red.)
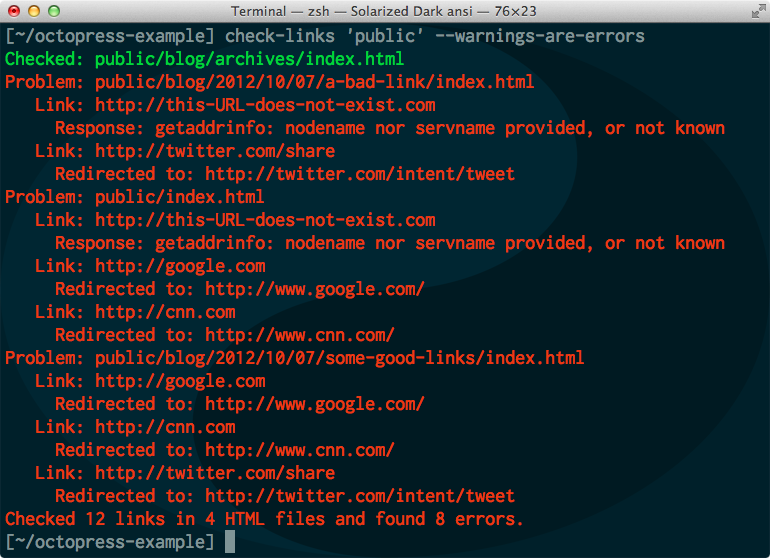
Or maybe you do care about redirects. Maybe you want redirects to be considered errors, so that the check-links
command will return an error on the command line if it finds any redirects. Just pass the parameter --warnings-are-errors
.
By default, the link checker will spawn a new thread for each HTML file so that it can scan files in parallel. And it will also spawn a new thread for each link so that it can check URLs in parallel. If you have a large site then this will get out of hand quickly and thrash the machine. So that’s why there is a maximum limit to the number of threads that it will spawn. The default is 100 threads, but you can adjust that with the max-threads
parameter.
check-links 'public' --max-threads 400
…or:
check-links 'public' --max-threads 1
The whole point of me creating this thing originally was to scan my Octopress sites for bad links. The finishing touch for that would be a check_links
Rake task. It’s easy to add that to any Octopress site. Just add this to your Rakefile
:
1 2 3 4 5 |
|
To adust parameters, pass in an :options
hash:
1 2 3 4 5 6 7 8 |
|
Now you can invoke that with:
rake check_links
It’s yours, do what you want with it. Enjoy.
The link-checker gem is an open-source project and I welcome any comments, issues, or most of all pull requests.
]]>Redis is a simple and very fast key-value store, that can be used for all kinds of things. Resque, for example, is a system built on Redis for
processing background jobs or even scheduled jobs. Redis can be used for all kinds of different things, and so it has a very generalized API that doesn’t
make any assumptions about how you’re going to use it. The Redis API includes simple methods like get
and set
and expire
. And the Ruby gem for Redis
is a thin layer over the standard Redis API.
But when most people use Redis, they tend to use it for caching values in a web application, like you would use memcached. And if you use Redis for caching, then you might find yourself writing the same sort of code structure over and over:
1 2 3 4 5 6 7 8 9 10 11 12 |
|
It’s great that Redis#get
and Redis#set
and Redis#expire
are all so simple. But if you’re going to wrap expensive operations in Redis caching frequently, then what you really need is a Redis#cache
method.
With Ruby, you can monkey patch anything, so it’s not difficult to add a new convenience method to
the Ruby bindings for Redis. We can just open the Redis class and drop in a new method. You can simply add a file called lib/redis_cache.rb
to a Ruby project in order to add a cache
method ot the Redis API:
1 2 3 4 5 6 7 8 9 10 11 12 13 14 |
|
The new Redis#cache
method accepts three things: a key
argument, an optional expire
argument, and a block of code. First, it checks Redis for a value at the given key. If one exists, then
it returns that value immediately. If one doesn’t exist, then it uses the code block to generate a value.
Then it sets the Redis key to that value. Then it sets the expiration, in seconds, on that key, if there
was an expiration argument provided.
This simple code teaches Redis to speak the language of caching, simplifying your high-level application code. Instead of the code pattern shown in the first code sample, distracting the reader from the problem at hand with caching details, the application code can be all about the values that it wants to calculate, with caching wrapped unobtrusively around the meat of the solution code.
For example, from the simple unit tests for the Redis#cache
method:
1 2 3 4 5 6 7 8 9 10 11 12 13 14 15 16 17 18 19 |
|
If you have a do_something
method that takes a long time to complete, then you can cache that
method at the key “key” with redis.cache('key') { do_something }
. Simple.
You might want to disable caching in development and test modes. You can add support for disabling
caching by adding a second optional argument to the Redis#cache
method:
1 2 3 4 5 6 7 8 9 10 11 12 13 14 |
|
If recalculate
is true, then the code block will be executed every time. So you can make
that value true in development and test modes like this:
1 2 3 4 |
|
Generally when you use this kind of caching, you’re using it to cache the results of some operation that’s really slow. If that operation is really slow because it involves the network, then maybe sometimes it might time out, and you might want to specify a default value to use instead when it times out. It’s easy to add support for a timeout using Ruby’s Timeout class, which is supported all the way back to Ruby 1.8.6.
At this point, it’s definitely time to switch to named parameters, so that the code that calls this method will be more clear and readable.
1 2 3 4 5 6 7 8 9 10 11 12 13 14 15 16 17 18 19 20 21 22 23 24 25 26 27 |
|
Here’s an example of using the new Redis#cache
method in a Rails app to cache the results of a call to the Twitter API, with a five-sectond timeout. This example will return a default value of nil
if the Twitter API times out. But you could also pass a :default => { 'something?' }
parameter in other scenarios.
1 2 3 4 5 6 7 8 9 10 11 12 13 14 15 16 17 18 19 20 |
|
If you have a Rails app that supports image uploads, then you probably use Paperclip. Paperclip codifies an assumption about attachment handling: that you know in advance all of the thumbnail sizes that your web site will need for your image attachments, and that you want to generate those thumbnails when attachments are uploaded.
But what if you need to be able to display thumbnails at any size, specified by request parameters? What if you want to upload image attachments without generating thumbnails, so that you can dynamically resize the images just-in-time (JIT) at any size specified by a user-editable view template?
Fortunately, Paperclip is flexible enough to handle that kind of scenario. This article demonstrates how to set up dynamic, just-in-time image resizing for Paperclip attachments in this example Rails 3.2.5 app.
First, we start with a basic generated Rails 3.2.5 app. Then we add a scaffold for an Image model. Then we add a Paperclip attachment called “attachment” to the Image model, with support for uploading an image and displaying the uploaded image.
You might have an Active Record model or two in your Rails app that supports Paperclip attachments that looks something like the Image model at this point:
1 2 3 4 5 6 7 8 9 10 |
|
We’re using S3 for storage in the example, so if you want to run the example then you’ll need to set up an S3 bucket for the example app and set some environment variables before you run the server:
export AWS_ACCESS_KEY_ID='YOUR_ID'
export AWS_SECRET_ACCESS_KEY='YOUR_KEY'
export S3_BUCKET_NAME='paperclip-just-in-time-resizing'
At this point, we can add a new Image to the app, and you can see the image on the “show” action. So how do
we set up dynamic thumbnails? We do that by setting
up
the :styles
for the attachment
to be a Ruby Proc, so that it’s evaluated dynamically each time,
by adding:
1
|
|
That Proc references the styles
method on the Image model:
1 2 3 4 5 6 7 |
|
The Image#styles
method normally returns an empty hash, which would mean that only the :original
style would exist. But if there is a @dynamic_style_format
set for this instance of the Image
model, then it will dynamically add a style to the list, with a symbol name derived from URL encoding
the geometry format for the style. So that, for example, the style “150x150>” would result in a style
with the configuration: { :150x150%3E => '150x150>' }
. The method that generates the symbol from
the geometry format string is very simple:
1 2 3 |
|
Finally, the real work is handled by the Image#dynamic_attachment_url
method, which sets the
current @dynamic_style_format
for the Image instance so that the instance will include the
dynamic style. Then it checks to see if a thumbnail already exists for the specified geometry.
It generates a thumbnail only if necessary, and then it returns a URL for that thumbnail.
1 2 3 4 5 |
|
This method allows you to specify a custom style format in a view template:
<%= image_tag @image.attachment.url %>
<%= image_tag @image.dynamic_attachment_url("150x150>") %>
The second image_tag
, above, uses the Image#dynamic_attachment_url
method to dynamically
generate a thumbnail with a 150 x 150 bounding box. Instead of specifying @image.attachment.url(:original)
or @image.attachment.url(:thumbnail)
or some other
pre-determined thumbnail style, you can specify any style format and the Image model will
generate the thumbnail just-in-time.
Wrapping it all up, the Image model looks like this:
1 2 3 4 5 6 7 8 9 10 11 12 13 14 15 16 17 18 19 20 21 22 23 24 25 26 27 28 29 30 31 32 |
|
The Image#dynamic_attachment_url
method enables you to specify any thumbnail size from inside
of one of your Rails app’s view templates. But what if the images will be embedded on other web
sites? What if you need to be able to provide a URL for an image that includes thumbnail size
parameters? That’s really easy, given what we already have.
First, add a route for the action that you want. In config/routes.rb:
1 2 3 4 5 |
|
Then add a simple controller action that redirects to the URL returned by Image#dynamic_attachment_url
.
1 2 3 4 |
|
Now we can call something like http://localhost:3000/images/1/thumbnail?width=300&height=300
to get an image thumbnail that is resized just in time. The second time that you go to the same
URL, you will see a much faster response because the thumbnail will already be waiting on S3 and
you will be redirected to it immediately.
Appleseed provides a generator for creating a new web site project with Rails 3, adding things like HAML and Compass to the new project, creating a Git repository for the new project, pushing that repository to GitHub, and then deploying the site to Heroku. All with one command.
This utility is designed to assist graphic designers in rapidly creating new web sites, for high-volume web shops. A graphic designer can create a site, push the code to GitHub, and deploy the site to Heroku without the assistance of a developer. Then a developer can easily join the project to build out the back-end and assist the graphic designer with the front-end.
Here is an example GitHub project that Appleseed generated, and here is the Heroku web application for that example project. Note the example layout, default home page, and Blueprint styling provided by Compass.
Open a Terminal window and copy the following command into the window:
gem install appleseed
In that same terminal, go to your local projects folder:
cd \~/projects
Then generate a new project by giving Appleseed the name of your new project:
appleseed my-new-rails-app
Appleseed will create the following:
\~/projects/my-new-rails-app
git@github.com:[you]/my-new-rails-app.git
http://my-new-rails-app.heroku.com
== Step 3: Run The Web Site
Your new web application is already running on Heroku. But for you to make changes, you’ll have to be able to run the web site on your local computer. You might want to open a new tab in your Terminal window for the server. Then change to the new project folder in your Terminal window:
cd \~/projects/my-new-rails-app
Then run the Rails server with:
rails server
Then go to http://localhost:3000
in a web browser, and you should see
your new web site.
After you make changes to your web site project, use these Terminal commands to push the changes to GitHub and Heroku:
git add .
git commit -m "Update."
git push github master git push heroku master
If the “git push” operation produces an error, then it probably means that somebody else has made a change to the same web site and you need to merge your update with their update before you can push your update. Do this:
git pull github master
Then after Git pulls the other person’s update and merges it with your
update, proceed with the git push github master
, above.
If Git reports that there has been a conflict, then commit the conflict and push it to GitHub, but do NOT push to Heroku:
git add .
git commit -m "Conflict."
git push github master
Deploying your web site after you make changes is really easy. Just push to the “heroku” remote:
git push heroku master
Repeat until the money runs out.
Appleseed generates a web application that’s more than just the default generated Rails 3 template. Instead of just a default working Rails application, you also get a default (“root”) controller and a root route to a home page. You get a layout based on HAML, and the Blueprint CSS framework provided by Compass. You get the RSpec and Cucumber testing frameworks and sample tests. The final product is ready for new HTML/CSS files and images from graphic designers.
The final product does NOT contain any database models, or an administrative back-end. It only includes a default controller so that graphic designers can easily add HTML files.
You can use the --no-github
option to tell Appleseed NOT to create a new
project at GitHub.
You can use the --no-heroku
option to tell Appleseed NOT to deploy your new web application to Heroku.
By default, the default template
will be applied to the new project. You can tell Appleseed to use your
own custom template with the --template
option. For example:
appleseed --template \~/templates/my-template.txt new-web-application
A simple way to customize the Rails template that Appleseed uses is to
fork the Appleseed project on GitHub and then edit the
lib/appleseed/generator.rb
file to use your forked project’s default
template URL instead of http://github.com/endymion/appleseed/raw/master/templates/default.rb
.
You will need an account at GitHu. Set up your GitHub name and email on your local computer. Then also set up your GitHub user and API token on your local computer. Then make sure that you have an SSH key set up and added to your GitHub account.
You will also need an account at Heroku. Install the Heroku gem and then use “heroku keys:add” to link your local computer to your Heroku account.
Once you have the above prerequisites, install Appleseed with gem
install appleseed
. Now you’re ready to generate web sites!
Copyright (c) 2010 Ryan Alyn Porter. See LICENSE for details.
Appleseed logo by Jessie Angles.
]]>When I was building the Tiesto.com web site and Tiesto’s fan club web site, InTheBooth.com, I needed a way to send authorized traffic from the members-only InTheBooth.com web site to ticket sale pages at Venue Driver (ticketdriver.com) to members-only pre-sale ticket-sale pages that the general public could not access. But I needed the Tiesto.com web site to be completely independent from the VenueDriver.com web site. I needed some way to authorize users on the VenueDriver.com web site from the InTheBooth.com web site, even though the two sites needed to run in different cloud environments, with different databases.
Open Sesame was the solution that I came up with. It generates an authorization token by packaging a time stamp with a cryptographic hash of that time stamp plus a secret phrase. The receiving end can take the time stamp and the secret that it also knows about, and generate a cryptographic hash of its own. The it can compare that hash to the hash included in the token. If the two are the same, then the token is verified.
I also needed a way to pass parameters from one site to another, and so I added an OpenSesame::Message
class, for protecting the integrity of a string without encrypting it.
When I originally built OpenSesame, I needed it for passing traffic between two Rails apps. Tiesto.com, and VenueDriver.com. Recently, I wanted to use it to pass authorized traffic between two Sinatra apps. I discovered that I had built it to depend on Rails. And also to depend on both sites being on computers that are in the UTC time zone. I rebuilt OpenSesame to use Ruby, without Rails. I packaged it as a Ruby gem and published it on RubyGems.org. I also added Yardoc documentation, and I confirmed 100% RSpec test coverage using SimpleCov.
Web Site A has an authenticated user that it wants to send to a protected feature on Web Site B. It generates an authorization token that consists of a cryptographic hash of a timestamp plus a secret, plus the timestamp in plaintext.
Example:
timestamp: 2009-06-25T10:34:29-04:00
secret: "OPEN SESAME"
token: 20090625T1034-93a9d935fc64285645870a59db0d287b58f7caea
Web Site B then checks that the timestamp is not more than an hour old, and it checks to verify that the timestamp plus the shared secret produces the correct hash. Web Site B should deny access with a 401 response if the authentication token does not verify.
cd your_app
script/plugin install git://github.com/endymion/open-sesame.git
The default secret is “OPEN SESAME”. You should change that because the default secret is public knowledge. Add the secret to your config/environment.rb:
OPEN_SESAME_SECRET = "Don't tell anybody, this is a secret!"
Or, if you want to keep that secret out of your source code then you can use an environment variable, like ENV['OPEN_SESAME_SECRET']
. You can configure that environment variable on Heroku, for example, by giving this command to the terminal:
heroku config:add OPEN_SESAME_SECRET="Don't tell anybody, this is a secret!"
For example, with Rails, you could do this in a controller in the first web app:
token = OpenSesame::Token.generate(OPEN_SESAME_SECRET)
redirect_to "http://second-app.net?token=#{token}"
In the second Rails app, you can verify the presence and validity of the token with:
before_filter :check_token
def check_token
return if session[:open_sesame_verified]
if params[:token].blank? || !OpenSesame::Token.verify(params[:token], OPEN_SESAME_SECRET)
render :text => 'access denied', :status => 401
end
session[:open_sesame_verified] = true
end
You can also pass signed parameters. Let’s say you want to identify each user and you don’t want them to mess with the ID that you pass.
message: 123456789
secret: "OPEN SESAME"
token: 123456789-e349b9416e2b9f6954e80f03a5bb63d3f7401b70
From the first web app:
token = OpenSesame::Token.generate(OPEN_SESAME_SECRET)
username = OpenSesame::Message.generate('username', OPEN_SESAME_SECRET)
redirect_to "http://second-app.net?token=#{token}&username=#{username}"
In the second app, you can verify both the token and any parameters:
before_filter :check_token
def check_token
return if session[:open_sesame_verified]
if params[:token].blank? || !OpenSesame::Token.verify(params[:token], OPEN_SESAME_SECRET)
render :text => 'access denied', :status => 401
end
params.keys.each do |param|
if OpenSesame::Mesage.verify(params[param])
session[param] = OPenSesame::Message.message(params[param], OPEN_SESAME_SECRET)
end
end
session[:open_sesame_verified] = true
end
The gem is hosted at RubyGems, and the documentation is hosted at RubyDoc.info. The code, of course, is hosted on GitHub.
]]>Rails applications are not always born as Rails applications. Sometimes graphic designers create web designs using tools like Dreamweaver and then pass them off to software developers for implementation as web applications
But Rails has a different model for a web site than a graphic designer’s authoring tool like BBEdit. Rails thinks in terms of routes that lead to actions that render using templates that can use layouts, but web authoring tools like Dreamweaver and Rapidweaver think in terms of pages. Every page includes the whole layout.
Ginsu plugs your graphic designers into the agile software development process, by automating the creation of ERB templates and Rails layout files from HTML files. Ginsu can create hybrid web sites with some sections served as static content and some sections powered by dynamic Rails actions, or you can convert every page into an action, and every Dreamweaver layout into a Rails layout. It’s not specific to Dreamweaver because it slices out content based on HTML CSS selectors, so you can use it with any HTML authoring tool.
You work in a high-volume web shop. Your job is the nerd stuff: programming the dynamic parts of web projects and dealing with site implementation and hosting. A producer gives you a .zip file and tells you that the deadline to get the site hosted is that afternoon. The .zip file contains static .html, .css, image and Flash files from a Dreamweaver project that a graphic designer developed. Then, the punchline: “Only pages X and Y need to be dynamic, leave the rest static. We’re still designing it. Oh and we’ll be updating this part of page X and this part of page Y once a week.”
You don’t want to work with a graphic designer every week to update your .erb or .haml files because that makes updates very expensive, which is not very agile. You don’t want to configure your web server to serve only a few routes from your Rails app because making changes is hard and so that’s also not very agile. You can’t implement a CMS back-end for making it all irrelevant because you work in a high-volume shop and you only have an hour.
You need a way to bring your graphic designer into the agile process, so that you and the designer can both make updates to your respective areas of the project.
cd yourapp
mkdir static
Copy your static web site from your graphic designer into your Rails
application’s new static
directory. If your static web site has a root index file called index.html
, then your Rails app should have a file called static/index.html
.
Configure Ginsu to slice sections of pages from the static web site into
partial templates in your Rails application by adding slicing
instructions to your config/initializers/ginsu.rb
:
# Create a 'header' partial by plucking header HTML from static/index.html using a CSS selector.
ginsu.partials << { :css => 'h3.r a.l', :static => 'index.html', :partial => 'header' }
# Create a 'header' partial by plucking header HTML from static/index.html using an xpath selector.
ginsu.partials << { partial :xpath => '//h3/a[@class="l"]', :static => 'index.html', :partial => 'header' }
# Just use the 'search' parameter to use either CSS or xpath.
ginsu.partials << { :search => 'h3.r a.l', :static => 'index.html', :partial => 'header' }
ginsu.partials << { :search => '//h3/a[@class="m"]', :static => 'index.html', :partial => 'header' }
# Create symbolic links in the public/ directory of the Rails app for selected sections and files.
ginsu.links << { :static => 'galleries' }
ginsu.links << { :static => 'events' }
ginsu.links << { :static => 'holdout.html' }
Now when you run:
rake ginsu:slice
…Ginsu will find the header in your static/index.html
file and create a partial in app/views/\_header.html.erb
with the contents of the HTML element that it locates using your CSS or xpath selector.
Using this technique does not require your graphic designer to make any changes to the Dreamweaver project. You don’t have to tag the section that you want to slice out, you simply describe where it’s located and Ginsu will find it and slice it out. You bring your graphic designers into the agile process by enabling them to update parts of the web site with their tools, without learning Rails.
Install the Ginsu gem in your Rails application with:
script/plugin install git://github.com/endymion/ginsu.git
Generate your initializer, for configuring Ginsu:
script/generate ginsu
The Ginsu configuration is in the initializer file config/initializers/ginsu.rb
:
require 'ginsu'
Ginsu::Knife.configure do |ginsu|
# The default location of the static web site is 'site', but maybe your static
# site includes 150 MB worth of Photoshop .psd files and you don't want those
# in your Capistrano deployments. Change the source path here if you want.
ginsu.source = '/home/webproject/site'
ginsu.partials << { :search => '#header', :static => 'index.html', :partial => 'header' }
ginsu.partials << { :search => '#footer', :static => 'index.html', :partial => 'footer' }
ginsu.links << { :static => 'galleries' }
ginsu.links << { :static => 'news' }
end
A partial is the content of an HTML element that Ginsu will partial out of a static HTML document and drop into a Rails partial template.
A link is a page or a folder that you want to be entirely served as
static content. Ginsu will create symbolic links in your Rails
application’s public/
directory for each link.